- The Fisher Price Company (now a division of Mattel) manufactures a wide variety of Preschool Basics, Playsets, Kidtronics, Dolls, Little People, Great Adventure Series, Shop 'N Cook, Ride-Ons, Action Tools, Sports & Activitiy Toys, Juvenile Products, Nursery Toys, Toddler Beds, Car Seats, etc. Their address and phone numbers are as follows:
Fisher-Price, Inc.
636 Girard Ave.
East Aurora, NY 14052
(716) 687-3000 Fax: (716) 687-3667
Or, you can email Fisher Price directly at consumer@fisher-price.com (they are often very busy in trying to respond to email, so you might wish to try the phone number, below).
- If you are looking to replace part of a newer set: It is possible that Fisher Price still has the parts you need. They keep a small inventory of "Bits and Pieces" around for some time (even after a toy is discontinued). These items are sold first-come, first-serve, and once they're gone, they're gone. You can call their "Bits and Pieces" toll-free number at 800-432-5437. Their hours are 8:00 AM - 5:00 PM Eastern time. Additionally, Fisher Price's Canadian "Bits and Pieces" number (which is answered out of East Aurora, NY as well) is 800-567-7724.
|
^Back to top of Page^
This Old Toy Fisher-Price This Old Toy Fisher-Price This Old Toy Fisher-Price This Old Toy Fisher-Price This Old Toy
|
|
Here's a real can of worms........are you ready?
If you're trying to determine the identity of a particular toy, there are a few tricks that you can use.
First, you must determine the Fisher Price Model Number of the toy. The model number is either printed on one of the lithos, or is cast or stamped into the bottom of many wood or plastic base toys, and can be up to a 5-digit number. If your toy is a doll, the model number is printed onto the "care instructions" tag that is sewn onto the doll (normally on the bottom side; many times it's completely faded from use though). Once you have this model number, then go to our TOYS BY MODEL NUMBER area and select the appropriate model number range and find the particular toy that corresponds to the model number you have. NOTE: there are many instances where a Model Number was used more than once; for example, the #104 was first used in 1931 for the "Lookee Monk" pulltoy, then in 1971-72 for the game "Animal Scrabble Set", and finally again in 1981-on for the Music Box "Allouette".
So, let's say you've identified the proper Model Number, and it's an item that was made for a number of years.....such as the #991 Circus Train (1973-1986). Which year was "your" toy made? The best way is to look at the "date code" of manufacture that Fisher-Price started using in the early '70's. This is a small letter and number that is molded or stamped on the bottom or back of wood or plastic base toys. We have found that this date code works perfectly on all Little People airplanes, such as the #182 Airplane, #183 Funjet, the plane used in the #996 airport, etc. It also works perfectly on the Little People plastic barn bases, and on Little People train engines. This date code doesn't seem to work for ALL toys, though. We have a #944 Lift & Load Lumber Yard that has "S4" molded into the bottom of the base; according to the chart below, this means it was made in October 1974. This date is improbable since the #944 wasn't sold until 1979. Therefore, please be careful when using these date codes:
Fisher-Price Toys Date Code
A=January
B=February
C=March
D=April
E=May
H=June
|
K=July
M=August
P=September
S=October
T=November
X=December |
*This chart was provided by Brad Cassity
If your toy has one of the letters mentioned in the chart above (A-X) and a number (0-9), then this date code may help you to identify the exact year and month that your toy was made. The letter represents the month, and the number represents the last digit of the year that the toy was made. Therefore, if you have a #996 Airport airplane and it has "D4" on the bottom, then that airplane was made in April 1974. Likewise, if you have a #915 plastic base barn and it has "T4" on the bottom of the base, then you know it was made in November 1984.
Please note that this date code system does not seem to apply to everything. If your toy is pre-1970, or it doesn't have a date code, then there is NO OTHER WAY to precisely determine the year that the toy was made.........unless the toy was made during a period in which one of the logos (below) was changed, or there was some significant visual change to the toy during those years (which is noted in our listings). Sorry, we know that's not the answer you want to hear, but it's true.
Also, beware: most toys have a Copyright Date that is printed next to the model number (on a litho, on the sewn tag, or cast into the bottom of plastic-base toys). This date is preceded by the copyright symbol © and is called the Copyright Date. The Copyright Date is NOT the date the toy was made; in fact, the Copyright Date normally precedes the first year of production by 1-2 years (example: the 915 Farm has a Copyright Date of 1967 and it was introduced in 1968).
AND, to add to your confusion, consider this: as is standard within the auto industry, many toys are "introduced" during the calender year prior to their "model year". For example: the "1999" Chevrolet Camaro actually goes on-sale in September, 1998. This same practice is common in the toy biz: some (but not all) new toys are "introduced" during the previous calender-year. So a "new-for-1976" model toy may actually have been in the stores for the 1975 Holiday selling season (October-December).......since this season accounts for almost 50% of yearly toy sales, the manufacturers and retailers are always anxious to make the newest, latest, and greatest toys available during this buying frenzy. However, the toy never appeared in a "1975" catalog, only in the manufacturer's 1976 toy-line catalog (where it would be shown as "new for 1976")........which means, of course, that the "1976" catalog was actually produced sometime in 1975!
Think of it in this way:
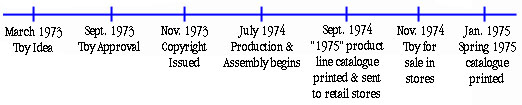
In the above example, it's a 1975 toy; that's the first "catalog-year" that the item appeared for sale in a company sales brochure.
Whew! Are you confused yet? Don't worry. All of the dates on our site are listed by the catalog-year dates (according to when the toy first appeared in a manufacturer catalog or price list, and what "year" that catalog or price listed is dated) and NOT according to the actual real-life "calender year". So a "1976" toy, which first appeared in a "1976" catalog or price list, is listed as being a "1976" toy EVEN THOUGH IT COULD HAVE CONCEIVABLY BEEN PURCHASED AT A RETAIL STORE IN LATE 1975 (such as Sears or Macy's, etc.). We use the manufacturer's "catalog-date" to date the toys (and believe that you should, too).
WAIT, there's more! Because of the above "model-year" considerations, it may be possible that you will find a store catalog or advertisement (i.e. Sears) dated in 1975 with a toy listed on our site as being new in 1976. We use the manufacturer's "catalog-date" to date the toys! So, if you come across such a situation, don't panic; now you understand why!
One last thing: on many of the component pieces to the playsets (Little People, Adventure Series, Husky, etc.), some pieces will have a one or two letter/number cast into the piece (i.e. "2", "G", etc.). These are NOT date codes! As best as we can determine, these are the mold numbers that the item was produced in.......the company probably had several different molds that were used to produce, say, the black plastic wheels for the cars, and each mold had its own identification number ("2", etc.) for quality-assurance purposes. Click here for a quick peek!
|
^Back to top of Page^
This Old Toy Fisher-Price This Old Toy Fisher-Price This Old Toy Fisher-Price This Old Toy Fisher-Price This Old Toy
|
Another way to attempt to "date" a toy....especially the pre-'70 products......is through the study and analysis of the Company Logo Design that appears on the toy or on the packaging box. Since the company changed their logo a number of times, this method of dating can sometimes assist you, but most often (surprise!) just adds to the confusion. Here's why:
|
A
|
B
|
|

|
|
1931-1955
|
1956 only
|
|
C
|
D
|
E
|
F |

|

or
|
|
 |
| 1957-1961 |
1962-1971 |
1972-1983 |
Dates Unknown |
Let's go over them one at a time:
|
|
(A) Used from 1931-55, this is one of the least reliable dating logos (since it didn't change very often); the most beneficial thing about it is that if you see it on a toy (or a packaging box), well, that means it's old! However, note this: items made in '56-later that were originally introduced before 1956 may still carry this logo design on the toy, on the box, or both!
|
|
|
(B) A very nice new logo, wouldn't you say? And really great for dating purposes, since it was used for one year only (1956). However, toys made in '57-later that were originally introduced in 1956 may still cary this logo design on the toy, on the box, or both!
|
|
(C) This logo introduces the "Second Generation" of company logo designs, a very creative and attractive design that would last, in its various forms and versions, for almost 40 years! Not bad!
Introduced in the 1957 model year, it appears in catalogs, toys, and boxes until at least 1961......and has even been seen in some company catalogs and brochures until early in 1963. As usual, items made during this era sometimes carried this logo design, or may have still carried logo "A" or "B" (depending on the original toy introduction date)........or maybe they didn't! Having fun yet?
|
or
|
(D) A nice refinement to the above design.........it's the same logo, but now "wrapped up" pretty in an outline of a gift box, complete with the ornamental "bow" on the left side. This logo actually appears in some catalogs and toys as far back as 1959, but doesn't come into predominant use until the 1962 model year. The last use of this logo appears to be in the 1971 model year.
Sometime during this period, the logo received an enhancement in the form of the words "An Original" above the red and blue circles, thus making the logo read as follows: "An Original Fisher-Price Toy". Although it is unknown when or why this change took place, our best guess is that it was inspired by the introduction of cheaper "look-alike" products by competitors, or even outright toy forgery by crooks........and this change would supposedly add reassurance to the customer that what she was getting was "the Real McCoy".
|
|
(E) A minor refinement occured in 1972 as the lettering style (text "font") for the "Fisher Price Toys" wording changed in three ways: first, it changed from all-capital-letters to a mixture of upper- and lower-case letters; second, the text was in bold type, and last, the font was a new design....actually known as Fisher Price Font, since it is specific to and developed by the company.....and it's really neat looking!
This logo design hit the shelves for over 10 years, seeing its last use in 1983.
|
|
(F) The use of this logo design is hard to pin down.....it appears in very few brochures, but does appear on some products and boxes. We can only assume that once Fisher-Price started marketing a number of non-toy products (such as furniture, roller skates, etc.) that it was necessary to drop the word "Toys" from the corporate logo.
|
 |
(G) The "Third Generation" of logo design. This logo (officially known as the "awning" design) appears as several different versions from 1984-up. The basic design is shown as style "G" in the pictures above. Four red scallops, outlined by a white pinstripe, hang below a horizontal bar.
|
 |
(H) The next variation "H" is the same logo, but with the words "Fisher-Price" (in white) placed within the "awning" design. These two styles (G+H) have been used simultaneously from 1984-present. If logo style "G" was used, then the words "Fisher Price" would usually appear somewhere else on the packaging or on the toy.
Style "G" appears to be the "earlier" version, appearing in 1984. Style "H" seems to have been a later variation, but starts to appear more and more often beginning around 1989, and then predominating from about 1994-on.
|
 |
(I) Another variation appears in 1991, and is shown as style "I" in the table above. In this version, the words "Fisher-Price" (in black) were directly below the "awning" design, and underlining the words was a horizontal blue bar. Lasting for only 3 years or so, this logo may represent the merger of the Kiddiecraft Toy Company into the Fisher-Price "umbrella" of toy companies, as Kiddiecraft had recently been acquired by Fisher Price. This "I" style logo appears in some product catalogs and on a few toys made during the 1991-1995 time frame.
|
 |
(J) Finally, most of the re-packaged Kiddiecraft toys ('91-94) used this logo style, where the "awning" was now blue (instead of red), the words "Fisher Price" were in white, and there was a red "pinstripe" tracing underneath the four scallops of the awning. An interesting side note is that the Kiddiecraft toy line items were then sold in Fisher-Price brand name packaging, but many of the toys still had the Kiddiecraft decals and logos on the toys themselves.
|
Some final thoughts on logos and dating:
Prior to 1984, the company logo almost always appeared on the packaging box, and many times on the toy itself via a decal, tag, or lithograph. However, from 1984-up the corporate logos appeared on the toy itself less and less (but it still always appeared on the packaging).
And remember this: a toy that was made before and after a logo-change year may be difficult to date properly if you try to rely on the logo style as an indicator of the age. For example, the #915 farm was introduced in 1968, but in 1972 the company logo changed. But, 915 farms made in 1972-3 (or even later) may have had the earlier ('68-71) design logo printed on the roof litho. This isn't always true, but is certainly something to be aware of when trying to properly date an individual toy.
And finally there's the issue of logo use on the catalog vs. logo use on the box vs. logo use on the toy itself. In some cases, we've seen the catalog use one logo style, the box a different style, and the toy a third style......whew! In one case (and we haven't seen everything!) the box itself had three different logo's used on it, click here to see! It makes you wonder if the folks at FP had some sort of corporate logo-schizophrenia!!
Anyway, these are the facts, and are some of the many things you must consider when researching your lovable old toy! Happy hunting!
|
^Back to top of Page^
This Old Toy Fisher-Price This Old Toy Fisher-Price This Old Toy Fisher-Price This Old Toy Fisher-Price This Old Toy
|
|
Imitation, they say, is the greatest form of flattery. And though that may be true, in the case of copyright or trademark-protected products, it is also illegal.
Like so many other succesful, market-leading companies, Fisher Price has had its share of unauthorized competitors. Sometimes it takes the form of a "me-too" product........very similar to the original, but different enough (upon close inspection) to not infringe on any legal rights of the originator.
And then there's the pure unadulterated fakes...........such as the Illco "little riders" vehicles and the Mexican "JP" Company products such as the #146 Pull-Along Lacing Shoe and many others. Some, like the Mexican JP products, are easy to distinguish from the real ones.........the wording is all in Spanish...........while others, like the Illco vehicles and some Little People figures take a trained eye to distinguish. So, as always, "caveat emptor".............let the buyer beware!
Of course, if you're still confused, frustrated, or baffled, always feel free to write to us at info@thisoldtoy.com and we'll always be happy to try to assist you in any way possible!
|
^Back to top of Page^
This Old Toy Fisher-Price This Old Toy Fisher-Price This Old Toy Fisher-Price This Old Toy Fisher-Price This Old Toy
|
Collecting Fisher Price toys, like collecting any other item, can be both fun and an investment. For our part, we're in it for the fun - the investment comes for free.
Fisher Price Collectors Club (FPCC) - - The FPCC is a Non-Profit club organized for the CARING and SHARING of Fisher-Price Toys. Membership includes a subscription to their quarterly news-magazine called the Gabby Goose. For information on joining, please see our link page.
A few thoughtful comments on various "Price Guides":
Price guides should be used with the following thoughts kept in mind. All of the price guides in the various books and publications are price ESTIMATES, NOT ACTUAL PRICES. You cannot and should not attempt to use any price guide that we know of as an absolute guide to the value of a particular item or set. Why is this so? Two reasons. First, no published price guide can ever be fully up-to-date; the information is therefore aged, and in the fast paced, changing market of collectable toys, any aged information is just that.....it's OLD. Price guides are not like Advertisements in the Sunday paper; they are not the "fixed" price of the item, as if they were for sale at a store. Second: prices vary GREATLY depending on a number of realistic factors: the location of where either the buyer or seller is (for example, prices are higher in the North than the South, lower in Canada than in the U.S., etc.) This thought applies to both the location of the buyer or the seller. Prices vary greatly as to what VENUE the item is being sold thru.......is it at a garage sale, a full-service store, or an individual, casual seller on E-bay? And what about the condition of the toy?.....is it new in the box, just average, well-worn, etc? All these factors (and more) greatly influence the price of any item, and thus must be kept in mind.
Therefore, Price Guides must be used as what their name states: only as a GUIDE. The relative values of an item.......for example, a 996 airport is worth $75.00......is a general starting point to refer to. But even more important, the "relative" difference between item prices is what matters. If the price in the guide for the 915 farm states "$25.00", then about the ONLY thing that you can be confident with is that the 996 Airport Set ($75) is worth about three times what the 915 barn is worth ($25). What a particular 996 airport set sells for may or may not be anywhere near $75, but it should still sell for approximately 3 times what a similar condition/completeness farm set would sell for. Again, so many factors can and DO influence the value for an individual piece that trying to use a price guide as a factual value source is like trying to hold water in a sieve....it just won't work.
So, what is an actual item worth? Well, whatever the buyer and seller agree to.......how much do you want to pay for that set of red castle thrones? How badly do you want it, and how much can you afford? What's the difference between $5 and $10 for it? Pay what YOU think and feel that the part is worth, and stop worrying about what a book says an item is worth!.....that way you'll be happy, and you'll have that great new toy that you wanted, too!
The Fisher Price book by Murray and Fox does it right. They provide a rarity guide and provide some ideas on how the rarity translates to a value, but do not set hard values. This makes a lot of sense, because East and West coast prices are NOT the same - just like North and South are different, and large town and small town are different. Rarity, however, is fixed - regardless of where you are (assuming the product is marketed fairly uniform across the country).
Books like Schroeders put a price out that reflects an item in a certain condition. They do explain this, and even provide some idea of how to adjust the value based on condition, but suprisingly few people seem to read this part (or take it super-seriously as it was intended to be).
Putting something in print seems to make it true - even if it is not. We often see items at collectable shows for prices that are so silly that they are laughable - only it isn't funny. In most cases, the dealer readily hauls out a book and uses the credibility of the printed word to prove to you that the price is fair and reasonable. However, in most cases, you can find the same thing at another booth for a vastly different price. We've been to antique stores before where a price was too high, so the item did not sell for over a year. The next time we went in, the item was still there, but with a HIGHER price. The justification was that the toy was shown in the next revision of the book at a higher price. How does this make sense? It was not marketable at the lower value - how can people be expected to pay more now???
Unfortunately, it works the other way too - we've seen people use the book to buy things that are priced above market value, and think they got a good deal because they paid less than book. In either case, the book is driving the price - not the other way around, like it SHOULD be. Our general opinion of price guides is that they set the prices, and do not reflect the prices - which just ain't right! The readers of such guides need to be very sensitive to these issues when using them, in order to avoid the problems that inevitably arise from having people take the prices in such guides as being "written in stone".
The real key in valuation is in relative rarity (back to Murray and Fox). This rating, assuming it was researched well, provides a system that crosses differing markets and forums. Coupling that with some basic cost guidance gives the reader an idea of what to pay.
So, with all this in mind, you are now better prepared to add to your collection without doubt (or guilt!) and actually ENJOY your purchase....without having to worry about "what the book said"! And finally, the real test of what these wonderful old items are worth is whether they make you feel good and happy once you bring them home.
|
^Back to top of Page^
This Old Toy Fisher-Price This Old Toy Fisher-Price This Old Toy Fisher-Price This Old Toy Fisher-Price This Old Toy
|
|
Disclaimer: We have used all of the methods below, and have had success ranging from very nice to ruining the piece. Normally, it is at least better than when we started - but there have been times... Anyway, we believe these methods work well, but your results may vary - so you will be using these at your own risk. That being said, here are the tricks that we have found usually work (you can scroll through the tips, or use the list below to jump to the section you want):
- Cleaning crayon and pen marks.
- Removing stickers or tape from lithos.
- Taking apart toys held together with nails
- Taking apart toys held together with screws
- Straightening kinked or twisted plastic pull strings
- Re-gluing lithos
- Litho Touch-up
- Music Box Repair
- Rust Removal
- Painting and Refinishing
Good luck!
- Cleaning crayon and pen marks: If the marks are on plastic, they generally come off easily. If they are on wood, it is still possible to clean them off. If they are on paper lithos - well.... this is not good. We generally start off with mineral spirits or paint thinner. On plastic, there will be no problems with this method. Use a cloth or toothbrush (that is not too wet). On painted wood, the same procedure applies, but don't rub as hard. We have never seen paint thinner take toy paint off - but we would still do this lightly, and check your work often. Lithos - well, we have had success using paint thinner here too - but if you rub too hard, you will ruin the litho - so work in small areas, and check your work often. Paint thinner is much better than any water based product (like Formula 409) which could make the litho wrinkle.
If Paint Thinner does not work, the next option we use is denatured alcohol (same process as described above), and as a last resort, a product that contains xylene (THIS STUFF WILL EAT SOME PLASTICS AND SOME PAINTS, so be careful). If you use xylene, use it quickly, wipe up any excess right away. It will clean most anything, but check your work frequently, and (if possible), test in an inconspicuous area first. Even xylene may not take a stain out of a litho, so it is better to give up than keep trying and make it worse than it was. Any stain that pentrates a litho (like felt pens) will be next to impossible to take out.
For cleaning just dirty lithos, a LIGHT application of a water based product (like Formula 409) to a rag may be required. Paint thinner does not do a good job on plain dirt.
- Removing stickers or tape from lithos: Place the sticker area horizontal such that liquid would not run off of it - or at least close to that position (don't actually put liquid on it yet - the analogy is for illustration). Take and tear up a double or triple folded piece of toilet tissue to a little larger than the sticker. Lay it on top (fully covering) the sticker. Take a cap full of mineral spirits and pour on to the toilet tissue, fully saturating the tissue to the point that it is very wet, but not running. Let this sit for several minutes. The mineral spirits should soak into the litho and surrounding areas. Ideally, the sticker is made of paper too, and the mineral spirits will soak into it as well. If the sticker is plastic (e.g., tape) or plastic coated, this process may still work, but will take longer. The idea is that the mineral spirits will either disslove or soften the sticker glue (depending on the type of glue it is). The purpose of the tissue is simply to hold mineral spirits (like a reservoir). After several minutes, take the tissue off and see if there are any edges that are starting to come loose. If so, SLOWLY pull the sticker off. If it becomes difficult, or ANY litho starts to peel away with the sticker, stop immediately and go back to the tissue with more mineral spirits. The next time you try peeling, start from a different place (NOT where the litho peeled).
We have had success with this method, but it may not work on all stickers or all tape. After the sticker is off, use more mineral spirits to clean up any residual glue. You can rub a little to get this off, but be careful not to rub too hard. Watch your work closely. When you are done, the whole area will look wet, and it may take a day or more to dry (this is not water, so don't expect it to dry as fast - on the other hand, water would ruin your sticker, but the mineral spirits should not.
- Taking apart toys held together with nails: The trick is to avoid marring the wood or plastic. To do this, you need to use a wide, thin blade of some sort (to spread the load). We use a 1 inch wide putty knife. Usually, the knife can be tapped between 2 pieces of wood or plastic with a small hammer. Take it slow and easy, and watch for any problems (cracks developing, etc). Once the putty knife is in, if the nail is not tight, the knife may be all you need to pry the two parts apart. If not, use a second putty knife, and tap it in under the first one. If that still isn't enough, slowly wedge a screwdriver between the two putty knives. Don't try to use the screwdriver by itself, because you will probably dent the wood.
Only pry the two parts far enough apart to get a nail puller or claw hammer on the nail. You can also use a pair of wire cutters (but don't cut the head off!). In all cases, put the putty knife under the hammer/puller so it does not mar the toy. Use the puller to get the nail completely out. If you are prying thin plastic away from wood, get the knife as close as possible to the nail before attempting any amount of prying.
- Taking apart toys held together with screws: These screws are normally holding plastic to wood, or plastic to plastic. If a toy has what look like screw heads, you can use a screwdriver - however, push in hard on the driver, because these screws have an unusually steep thread pitch, which makes it easier for the screwdriver to slip out of the slot. Once it slips the first time, it will slip easier the next time, and will quickly deteriorate so that you will not get it out with the screwdriver. If this happens, either give up, or use a vice grip (and be prepared to scrap your toy). Also, these screws do break easily.
- Straightening kinked or twisted plastic pull strings: The pull strings often get knotted, and when you untie the knots, you end up with kinks and bends that look bad. Put the string in boiling water, and the kinks straighten themselves! However, there is a CAUTION here - we have found that in the process, the string sometimes gets fatter and won't fit back through the hole. An obvious solution here is to boil the string while it is still attached, however, care should be taken to avoid getting the steam near any lithos.
- Re-gluing lithos is best done with a white glue, such as Elmers Glue. If the litho is really loose, it is best to try to get it all the way off before applying glue. If you do get it off, then a spray adhesive on the back of the litho works best. If you can't get it off, then you might be able to work glue under the litho with a thin painter's spatula or a toothpick. Dried glue that pushes out beyond the litho can be cleaned up by just rubbing it off.
- Litho Touch-up: If you have artist inclinations, we hear that you can touch up lithos and scratches using Pentel color pens (available at many art stores, and some major retail stores like Costco). These are water based and can work well, but a little goes a long way, so less is better. Try first on paper to make sure you have it right. Fine Point #5360-102 (red) and -101 (black) are the most used.
- Does your music box, record player, change-a-tune TV, carousel, lacing shoe, or merry-go-round not play very well? Well, there's a couple of simple ways to solve this nasty problem, so read on:
The music box mechanism rarely "breaks", as they are very durable little beasts. However, what DOES happen is that over the years the mechanism gets either rusty, or, gunk and dust and grit and grime accumulates on the inner workings, thus "freezing" the working parts. There are three steps that you should take to try to remedy these situations:
A) Try to firmly strike the BACK side of the music box (or the bottom of a bigger toy) against a hard, flat surface.....such as a wooden floor, tabletop, or the driveway. It may take two or three tries (do this while the spring is wound) and do it FIRMLY, not HARSHLY (i.e. don't destroy the toy while attempting this!). Sometimes the firm jolt will free up a seized mechanism and then it will play again just fine.
B) If you're handy, you can take apart the toy carefully and try to CLEAN the mechanism with Naval Jelly (to remove built-up rust) and/or Mineral Spirits (to remove grease and gunk). Finally, you can LUBRICATE the moving parts with a light machine oil (such as used for electric razors or sewing machines). After these steps, if the mechanism works, great, you're done.........if not, you may still have to strike it against a firm object to free up a stubbornly stuck mechanism.
C) Still can't get it to work? Please visit our Repair Station.
- Rust removal......what's the easiest way? A product called Naval Jelly, available at most hardware stores, Home Depot, probably even Wal-Mart. This gel-like liquid can just be brushed on (or rubbed on with a Q-tip, etc.) and like the hair tonic, "just a little dab will do ya". Try not to get it onto the wood or plastic, or any litho/decal. A small green scouring pad or very fine steel wool (0000 grade) along with the Naval Jelly removes all but the most deeply etched/pitted rust like magic......great for wheel axles, levers, etc.
- Painting and refinishing. For plastic parts, there's not really a lot of refinishing that can occur----and of course painting is out of the question. To clean plastic, use the following products:
- Gerneral dust and dirt clean-up: dish soap with warm water. A stiff (but not a wire) brush helps you to get into the nooks and crannies.
- Lots of built-up gunk from over the years: A soft rag and mineral spirits (available at hardware stores, etc.).
- To remove stains/ink spots/crayon: the mineral spirits work pretty well, or you can also use some warm water and a bathroom cleaner product such as Comet or Soft-Scrub. Rub gently and be careful around lithos!
- Discoloration, burn marks, etc.: Once plastic changes colors and "fades" (lightens), there's not much you can do at all. You can't change the color back; some Armor-All may help bring it back a little bit, or at least make it shiny. Changes to the color that have penetrated beyond the surface of the plastic are also almost irreversible; if SoftScrub and/or mineral spirits doesn't work, then you're out of luck.
- Straightening warped plastic: Heat is the only possible solution. ALOT of heat. You'll probably have to get a heavy-duty heat gun, as home hair dryers just don't cut it. The idea is to heat up the affected area and then force it back into shape, which, depending on the severity of the warpage, may require you to buy some C-clamps and wood strips in order to "force" the plastic back into shape, then heat it, and allow it to cool. Note: don't expect miracles; plastic has a "memory" and tries to return to its original shape after it's been heated.
To clean wood, try these hints:
- Most wooden surfaces on these toys are painted, thus you are really cleaning the paint, not the wood. Try mineral spirits or just 409. For unpainted wood, there's not really much that can be done to clean it besides sanding or rubbing with steel wool or very fine (400 grit or greater) sandpaper. Be very careful around the lithos!
- Repainting: as a general rule, don't. And since you'll NEVER match the paint color exactly, remember that if you do try to repaint, you have to repaint the entire surface, not just one spot (exceptions exist, but the above statement is 99% true). And don't forget, once you repaint one area, then all of the other painted surfaces look older than the freshly painted area, so you'll probably have to paint those areas, too. And taking apart the old wooden toys is difficult....it's very easy to damage or ruin a wooden toy trying to take it apart (they weren't designed to ever come apart).
However, if you must, then try some Artist Supply stores in your area. We've used DEKA brand Sign Enamel (802-888-2962) and have to hand-mix every color to get the closest shade match. While you're at the Artist Supply store, better also pick up a color-wheel (to do paint matching) and an air compressor (because the paint doesn't come in spray cans). Before painting, you should do all of the standard "wood-refinishing" steps, such as paint removal, sanding, etc. A real chore. Our advice: don't do it. How are you ever going to replace that litho that you ruin?
|
^Back to top of Page^
|
 E-Mail us:
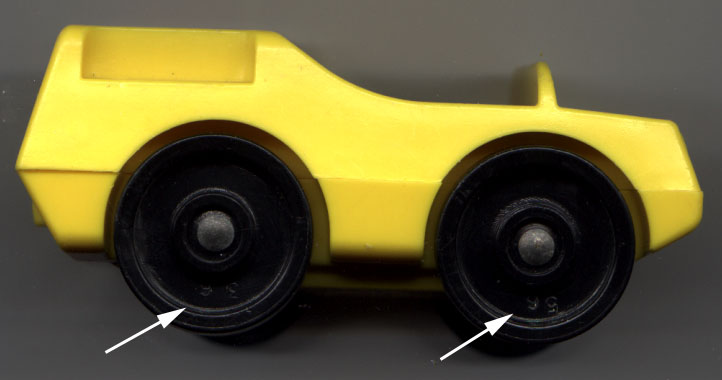